
 Posted on
by
Posted on
by  13 Comments
 Taking food photos that are light on a white backdrop might be something you’re struggling with. I’m giving you a couple of tips below to make better ‘white’ food photos!
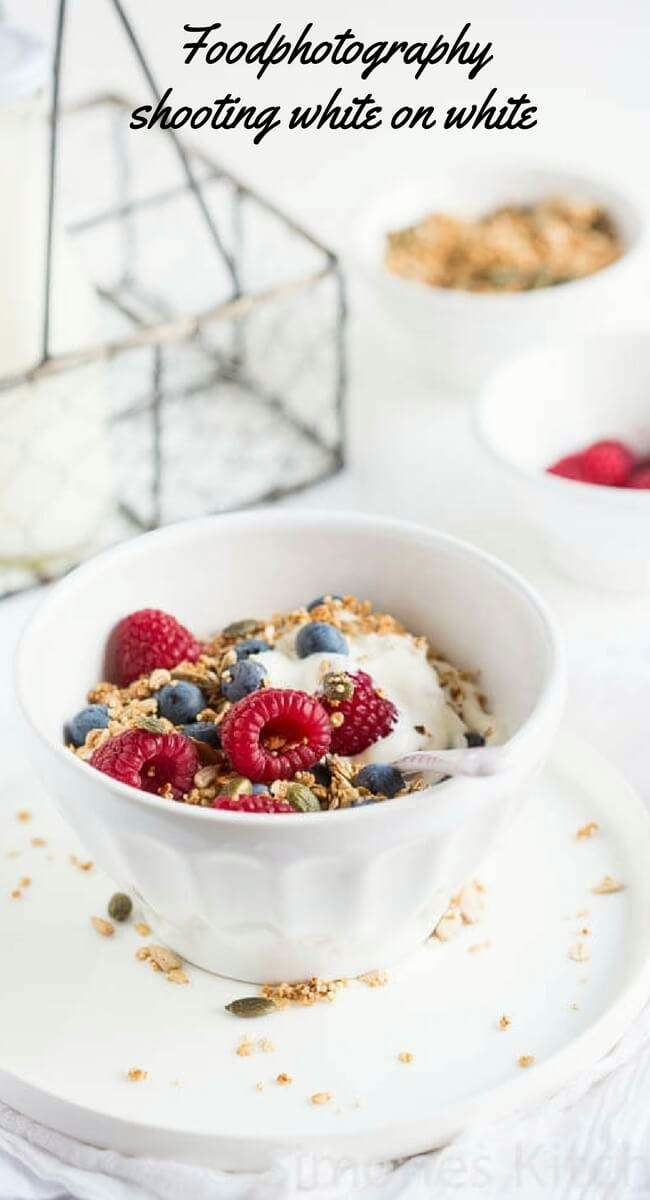
Table of contents
Food photography; white on white
I already gave you the recipe for this delicious little dish with quinoa last week and as promised I was going to tell you a little bit more about taking photos of white on white. As you can see in the picture it has an abundance of light or white colors. White background, white bowl, white plate, white milk and the only color is coming from the raspberries and the quinoa granola. A few weeks we also had the photoshoot from Alex and Ria where everything was whiter than white. During and after the shoot I got a lot of question on how to do things like that as ‘it always goes wrong when I try.’
Pressure points
So to start with the pressure points when it comes to shooting on white;
- All the white in your photo is being registered as light by the camera. So the automatic light measurement is getting it wrong and will underexpose your picture.
- Shadows: if you really want white than you don’t want any annoying shadows or at least as little as possible
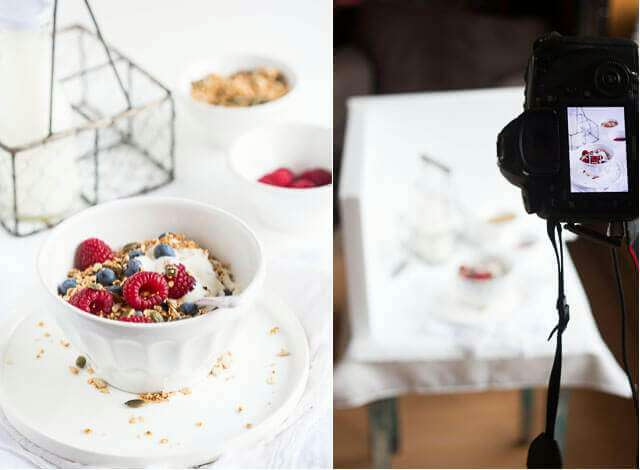
- Focus point: your point of focus (depending on your settings) will determine for a large part what the lighting will be as you can clearly see in the ‘behind the scenes’ shot I took below.
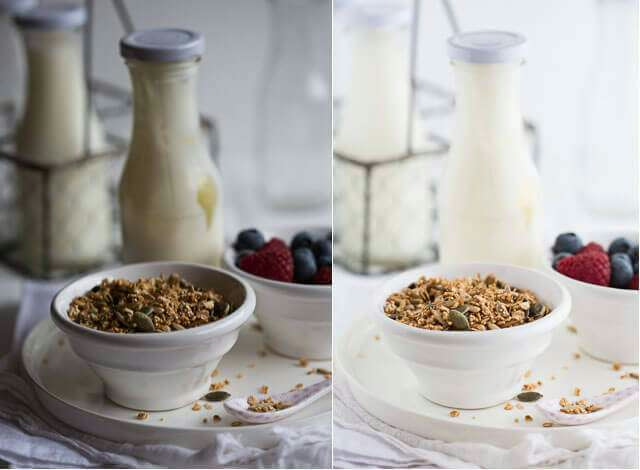
What is your focus point
With the photo on the left my focus point was on the white yoghurt bottle, with the right photo the focus point was on my black camera. As you can see the difference is dramatic. Your camera – in general – will be at a center weighted average. That means it will base the light measurements on the focus point and a bit of the surrounding area. In other words; your focus point is the most determining factor for setting the exposure. I am assuming in this example that you either shoot on automatic or half automatic (aperture or shutterspeed priority) If you shoot on Manual, the rules are very different.
Your camera is good but not that good
To start with problem 1; like I said the camera gets confused by all that white. You are the one that need to correct that registration error in your camera. There is no magic button for that except for maybe the snow or beach setting on your compact camera. (setting it on that presetting will mean your camera will overexposure a bit to compensate for the whiteness)
Using your camera’s measurement as a starting point it means you will need to lengthen the exposure to get back to having white in your picture. You can use the exposure compensation button for that (+/- button on the camera) but if you really want to shoot white on white the changes are you might not get the desired result.

Try shooting in manual mode
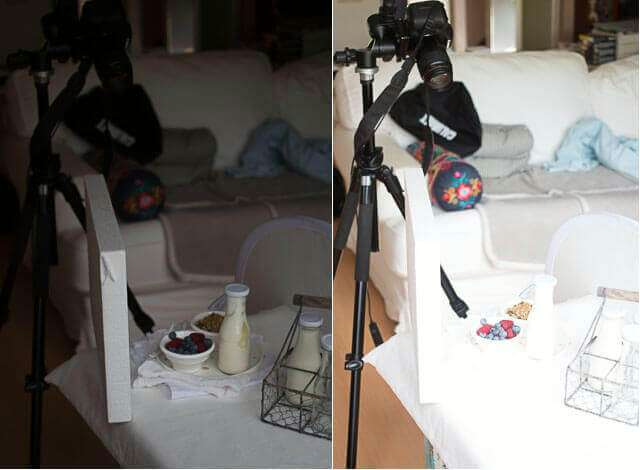
If you look above you can see the difference between the photo on the automatic setting on the left and the corrected photo on the right. On the left the shutterspeed is 1/160s at f3.5 and on the right the shutterspeed is 1/25s at f4.0. In addition, and that makes a big difference; on the right I am using a piece of foamboard to lighten up the shadows.
In photo 1 you see the setup.
That difference in shutter speed is likely hard to solve with the +/- button. The alternative is to put the camera on manual. Not as scary as you might think. You just take the settings your camera gave you on automatic and dial that in. Now you have a starting point knowing that you need to go lighter. I work with the aperture as a starting point so with the shutter speed (making it slower) I increase the total exposure..
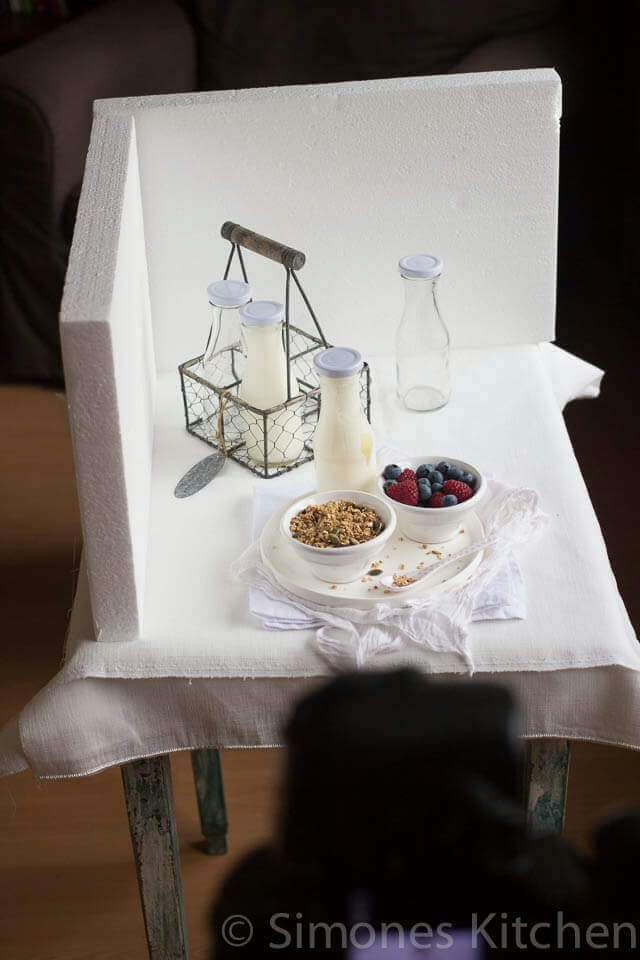
Minimize the shadows
Above the setup again. The light source is daylight from a big north faced window in our living room. To minimalize shadows I have used foam board on the left and in the back. The white in the back was visible but because it was so blurry you didn’t really see what it was. Moving to point two; the shadows.
Back lighting
My first setup ( the second photo) was with back lighting. I find that if it really needs to be white with limiting shadow sidelight is easier to work with.
Backlighting gives you more shadows in the front and in this case I didn’t have a lot of space to move around (small table) and I couldn’t move away from the light source (north faced window). But by adjusting exposure and using the foam it worked fine.
I explained the problem with the focus point above, but I want to add the following; if I work with a tripod I always focus manually and exposure manually. In that case you won’t have the same issue.
And lastly: if you have only white in view you might end up having no contrast in your picture anywhere.
Want to know more on food photography?


Every time it happens with me the camera gets confused with all white. Then I can’t fix it. But you gave a solution to the problem. I am going to try it next time. The post is indeed a helpful post and going to help them who are facing problem like mine.
I need to try white on white. I love the look.
Thank you Simone for the informative post and sharing this info about the foam board technique. Will surely give it a try.
Indeed a great post.I am going to try the foam board technique to deal with shadows,thanks a lot for sharing your knowledge.
Thanks Harini! Foamboard is really THE best tool ever and completely inexpensive (or free if you save some packaging from boxes)
Hi Simone,
I really like the way you explained the post. I just love white on white and for many years it was an unsolved mystery , am glad to read this, Thanks for posting. Love the fact the post is short and informative. Had a few questions:
1- Do you try to make sure the borders are seamless (RGB : 255) or you don’t bother about it.
2- Custom WB? do you edit WB in post processing.
He Simi! Thanks so much.. Glad you like it.. As for the borders; no to be honest I never even check if it is. I just go by look and feel rather than numbers.
I always shoot in RAW so my setting in camera is AWB or auto white balance. I know I can correct it afterwards in Lightroom. I should always shoot with a grey card but tend to forget to be entirely honest, so I just pick a neutral spot in the image to go with the white balance and it tends to work.
Great post Simone. Thanks for sharing 🙂
Great post. I’m glad someone shared it in our food photography group since I was not familiar with your site before. I will be back.
This being my first time at your site and not following your post I didn’t know your setup. I was wondering if you can tell us what your light source was in this shoot.
Thanks so much Jerry and welcome here… 😉 I have used simple daylight here with a window on the north-west side of the house.
This is a very informative post Simone!! Shotting white on white has always been a challenge. Now I know I can do it 🙂
Thanks Nandita! Can’t wait to see the results!
A great post, thank you! I’ll have to get a hold of a piece of foamborad…
Cheers,
Rosa